This has been a bit of a slow time working on the truck because of family circumstances and other events.
I was able to get some more work done on the lights (blinker lights). First I installed separate indicators instead of piggy backing on the main tail lights. I installed a new cutoff relay and was able to trace the wires inside the cabin to the outside.
After a few tries using a troubleshooting light I had the left side front and back working. The right side was also debugged except the lights will not blink.
I also received the spindles in which will be major work. I will post more soon.
Monday, August 26, 2013
Sunday, July 21, 2013
Fender work
When I got the Truck the right fender had a big dent on it. For a few weeks I have been deliberating a repair strategy. A few friends said I should try pulling it out without taking it apart others said take it off and use heat to bring it back.
A couple of weeks ago I decided enough deliberating -- lets get to work:
Here is a picture of what it looked like before:
I decided to remove the fender and try to bring it back using a maul.
The work required was a bit extra challenging because all the bolts holding the fender in place were rusted. I tried WD40 and the first few I tried snapped off. I took the grinding wheel and started cutting them. After 14 bolts I had the fender out.
Another challenge was grinding off the screw tops from the inside of the bed. I used a grinder to grind those off since it appears that the originals are welded in place with the studs pointing out. I was also able to get carriage bolts and washers from home depot. I will update the blog with an after dent removal picture so you can get an idea what it looks like tomorrow.
Overall body work is challenging, you have to wear protective gear when grinding and have to make sure everything lines up properly. My fender had some areas where I needed to weld so it took me a couple of weeks of part time work on it to get it back together.
A couple of weeks ago I decided enough deliberating -- lets get to work:
Here is a picture of what it looked like before:
 |
| Large dent on right fender |
The work required was a bit extra challenging because all the bolts holding the fender in place were rusted. I tried WD40 and the first few I tried snapped off. I took the grinding wheel and started cutting them. After 14 bolts I had the fender out.
Here is the truck with the fender off:
 |
| fender off |
Overall body work is challenging, you have to wear protective gear when grinding and have to make sure everything lines up properly. My fender had some areas where I needed to weld so it took me a couple of weeks of part time work on it to get it back together.
Tuesday, June 25, 2013
The next steps..
My restoration project is going well except I had a small set back during my work on the muffler. I was not able to get under the truck to install the muffler so I have been trying to find a person with a lift. The muffler is ready to go on but its hard to work on it with ramps. I will figure out a way around it. Basically the muffler goes on, a clamp connects to the exhaust pipe and the tail pipe connects to the other end with two or three places to hold onto the chassis. I am still researching it. In the meantime here is my priority list for the next few days.
1. Fix the horn (redo the wiring to it).

The horn button inside the steering wheel needed to be fixed. Filled it up with epoxy and put it back in. It seems to work except the horn needs cleaning or it is stuck. I applied 12V 5A to it and all I get is a clicking sound. How much current do these things draw? 10A??
2. Fix the rear wiring -- updates soon.
3. Install two new shocks on the back -- need to order
4. Fix the steering slack. -- Not sure of the source yet
5. Install new trusses and a wooden bed in the back bed.
1. Fix the horn (redo the wiring to it).
 |
| Horn Button |

2. Fix the rear wiring -- updates soon.
3. Install two new shocks on the back -- need to order
4. Fix the steering slack. -- Not sure of the source yet
5. Install new trusses and a wooden bed in the back bed.
Monday, June 17, 2013
Front end work -- Partial -- Sealed beams and Muffler prep work!!
As discussed previously my main goal is to get rid of the steering column slack. First things first I inspected the front ball joints and as I was doing this I noticed the u bolts holding the leaf springs in place -- near the front shocks were all loose. I tried to tighten them but they were too rusty. I went ahead and ordered two Monroe shocks for the front.
http://www.amazon.com/gp/product/B000COO3PM/ref=oh_details_o00_s00_i00?ie=UTF8&psc=1
Here is a picture of the old shock absorbers:
Putting the new shocks on would have been a ten minute job if it was not for the rusty u bolts
Finding replacement bolts was also a challenge. Thank God for Northern Tools that carry a similar bolt for trailers. After two trips to the store two Popsicle sticks and two planes for Andreas we completed this task by the end of the day on Saturday:
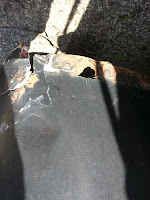
The next job completed was replacement of the head lights. This was not too trivial except one of the sockets holding the sealed beam was shorting out. I went ahead and replaced it.
No need to say too much here. This truck was a work truck. It got abused. My uncle pointed out the crack this weekend. Took me a few minutes to clean up the rust and stitch it back together.

Prepping the muffler was also a bit of work. After three welding jobs the muffler is ready to go on. I can not wait to get it installed. This thing is pretty loud.
http://www.amazon.com/gp/product/B000COO3PM/ref=oh_details_o00_s00_i00?ie=UTF8&psc=1
Here is a picture of the old shock absorbers:
 |
| old shock absorvers (what ever is left of them) |
Finding replacement bolts was also a challenge. Thank God for Northern Tools that carry a similar bolt for trailers. After two trips to the store two Popsicle sticks and two planes for Andreas we completed this task by the end of the day on Saturday:
 |
| Andreas (my son) enjoying his Popsicle and holding on to his $2.00 plane |
The next job completed was replacement of the head lights. This was not too trivial except one of the sockets holding the sealed beam was shorting out. I went ahead and replaced it.
 |
| Small crack on the chassis welded |

Prepping the muffler was also a bit of work. After three welding jobs the muffler is ready to go on. I can not wait to get it installed. This thing is pretty loud.
Wednesday, June 12, 2013
Front End Work
I am starting to get more run time on the Truck and just initiated insurance coverage. I will post more info on this soon because I run into an interesting problem.
I spoke with my uncle Dennis and he mentioned that it would be best to rebuild the truck's front end. Replace all the ball joints, cross bars etc. I got under the truck a couple of days and started shaking things to see what wiggles. I noticed that the large bolts holding the leaf springs in place on the front are loose. This is definitely an issue and I hope not a very difficult one to resolve. In the worst case I can cut the bolts off and replace them with new ones.
I will post pictures of this area in a day or two but I wanted to give everyone an update first. I also will need to change the front and the back shock absorbers (starting with the front one's first).
I hope this will not end up been a big deal. I will keep you posted!!
Pictures to follow!!
Monday, June 10, 2013
Little Truck is running again!!
So after all the work I have done this far I am starting to put some runtime on the engine!! Drove the little truck around the block a few times. So far so good. Neighbors came up to see the truck. It needs work but it runs!!
Sunday, June 9, 2013
White smoke where is it coming from??
Posted on 06/09/13
After rebuilding the carburetor, I did a bit more electrical work. I replaced the Main lights (7" Sealed Beams). I actually had to pull the old solder iron out, and some heat shrink tubing. I tested the lights and everything seems to be working well.
My Father in Law Miltiades Marinos happened to be around when I was done working on the truck. He remembers the truck when it was fairly new on the North woods. I took him for a spin around the neighborhood. That was more of a spin down in memory lane for him. I drove the vehicle for about 10 minutes and going up the hill from my house the vehicle hesitated a bit (as if it was getting starved for gas). At that point I stepped on the gas and a huge cloud of while smoke came out. I was a bit concerned so I drove it back in the garage.
I did some research on this overnight. The most logical explanation is that my air to gas ratio mix is incorrect. I will have to adjust this soon. I spoke with my brother who is a mechanic and he suggested to run the car and check to make sure the coolant is circulating properly in the radiator. My uncle Dennis Hovde also mentioned that there should not be any concerns with the radiator.
I started the vehicle today again and drove it a bit. I checked and the temperature of the upper and lower radiator hoses is about the same. Good signs.
Here is a picture of the ultimate goal for this project to keep the target in mind while going through all this work.
 |
| This is my ultimate goal. We are getting there slowly but surely!! |
Thursday, June 6, 2013
Continuing the work.. Carburetor rebuild
As mentioned in my previous post this was a safety issue that had to be addressed right away. The vehicle was not driveable with a leaky carburetor. I purchased the rebuild kit and took the whole thing apart. I read the instructions this time. I did a lot of cleaning using carburetor cleaner and sea foam. The carburetor cleaner does a better job.
Here is a picture of all the parts:
Taking a carburetor apart and putting it back together is a tricky business. You have to do things slowly. Study all the screws and where they go. Clean the jets very well. Remove all the debrie from inside. It took me a total of three evenings to complete the job. Cleaning everything very carefully pays back. I put the carburetor back and started the Truck. I only had to adjust the idle mix. The engine sounded much more smooth after this was done.
I will take a video of the engine running tomorrow.
Till later...
Here is a picture of all the parts:
 |
| Before I started taking everything apart. |
 |
| During the process of rebuilding |
.jpg) |
| Rebuild work completed |
I will take a video of the engine running tomorrow.
Till later...
Sunday, June 2, 2013
More work, but its fun work
So the Bottom line is that the truck starts and runs now. But like I said at the beginning of this blog, this is and will be work in progress for a while. I made a lot of progress over the last few days. I was able to fix the starter, replaced the solenoid, replaced a main positive terminal cable, replaced spark plugs.
The next step critical to be able to drive the truck is the carburetor leak (this is more a safety issue now). I went ahead and placed a fire extinguisher in the truck just in case.
I am in search of a rebuild kit for the carburetor. Here is a picture:
The carburetor is made by Holley. A quick google search returns hundreds of links. I have to find the right one.
While replacing the the spark plugs I also noticed that a couple of spark plug wires literally fell apart in my hands as I was taking them out. So I ordered a set of wires and as soon as I get them they are going on.
Here is a picture of what the wires look like right now:
 Kind of messy. Once I get the new cables I will reorganize them. The nicest thing about these older vehicles and motors, they are really easy to work on. I could not imaging getting all this work done in such a short time on a newer car or truck.
The next step critical to be able to drive the truck is the carburetor leak (this is more a safety issue now). I went ahead and placed a fire extinguisher in the truck just in case.
I am in search of a rebuild kit for the carburetor. Here is a picture:
 |
| picture showing the leak |
While replacing the the spark plugs I also noticed that a couple of spark plug wires literally fell apart in my hands as I was taking them out. So I ordered a set of wires and as soon as I get them they are going on.
Here is a picture of what the wires look like right now:

Thursday, May 30, 2013
Waiting for parts
I am waiting for parts to come in but this weekend I will be starting the F100. I am pretty confident the solenoid will do the job because I was able to get it to turn by bypassing the solenoid.
So this weekend I am planning on doing the next updates:
1. Replace solenoid
2. Replace spark plugs
3. Fix all the wiring related to the starter and the battery.
4. Secure the coil
More updates soon.
So this weekend I am planning on doing the next updates:
1. Replace solenoid
2. Replace spark plugs
3. Fix all the wiring related to the starter and the battery.
4. Secure the coil
More updates soon.
Tuesday, May 28, 2013
Troubleshooting the Starter
The driver kept coming off. I noticed from other websites that what I thought is two parts is actually one. Therefore I took it upon my self to weld them together. This experiment was actually successful. I put it back together and as stated above it fired for three four times and then got stuck.

Original 6V starter
Removed the starter again.
After removing it I found out the safety pin holding the spring together came off. I was lucky to pull the whole assembly out without loosing any parts inside the flywheel hole.
Removed the starter again.
After removing it I found out the safety pin holding the spring together came off. I was lucky to pull the whole assembly out without loosing any parts inside the flywheel hole.

showing the original spring -- half busted
Step two
So I went for a search of a pin. Two auto parts places and a home depot later -- and a total of $3.00 cost plus a monster truck for my son for $5.99
I tried "bench testing" the started with a 20A 6V power supply and no sign of kicking the gear. I did a bit more research to find out the starter actually draws about 10 times more power. Something like 1.2KW not 120W.
So I went ahead and put it on the vehicle again for the fourth time. I am getting good at this let me tell you. I secured all the cables with much confidence that everything is ready to go.
... Not so fast cowboy. Not suck luck. Now I can only hear a clicking sound coming from the solenoid.
I ordered a new solenoid today for $12.00 but just to gain more confidence I just overwrote the solenoid (by bypassing it) and the starter sounds good. Yeah... Now I am waiting for the new solenoid so I can move on with this thing..
I ordered a new solenoid today for $12.00 but just to gain more confidence I just overwrote the solenoid (by bypassing it) and the starter sounds good. Yeah... Now I am waiting for the new solenoid so I can move on with this thing.. I will post again when I receive it in.
Thursday, May 23, 2013
1955 Ford F100 Truck restoration project started when my uncle Henry James Hall gave me the nicest gift ever!!
Posted: 05/23/2013
The action plan is:
1. Fix the driver door latch: I have already done this. I will post a picture tomorrow
2. Fix the Starting motor to get it running. Target completion 05/27/13 (memorial weekend)
3. Start fixing the body -- Look at the rear fender:

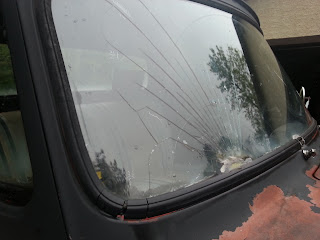
6. Replace the windshield and the broken driver window

 Listing a few other pictures here to document the truck's restoration process!!


7. The interior is also in poor condition!! Needs much TLC..


 The vehicle is a stick shift Three speed:
"Three on the Tree"


Posted on 05/24/2013 by Sophronis Mantoles
Here is a quick video from back in November of 2012 when we first got the truck running. After sitting for 20 years, we put fresh gas, a new battery, cleaned up the points and vala..
http://youtu.be/iSba6B6XUOg
Posted on 05/26/13 by Sophronis Mantoles
I fixed a couple of minor things over the weekend. Removed an old towing hitch and the front licence plate. I also took the starting motor off and found out that I need to do some work on it. I have to replace this component on it ( I am not sure what is called yet):

Here are a couple of pictures:
 Before
  After
After

I also found out that I will need to do something on the floor by the right door.
Here is a picture of the hinge I cut off:

posted on 05/26/13 by Sophronis Mantoles
After having troubles with my starting motor situation I started reading about it and came up with the following post on this web site:
http://en.allexperts.com/q/Classic-Antique-Car-2542/1955-Ford-F100.htm
Question
Hi Dick,
I am a little confused on this whole "positive ground" situation and it's getting deeper by the minute.
Background: A friend was temporarily storing this truck for someone and after driving it for a couple weeks the truck wouldn't crank. He replaced the battery with a new 6v battery from Napa #7204 and it drove for a couple more days until the truck wouldn't start again. I got involved to "help" and suggested the alt/gen was not charging properly.
I started out by getting a 6v charger and checking the terminals on the battery which appeared to be loose. My plan was to charge the battery and get it started to trouble shoot some more. So I put the charger on the battery as I typically would red to pos. and black to neg. and the charger would click on and off. I didn't think much of this because I have a few "micro processor" charger for 12v systems and the click on and off all the time. When I went back the next day the truck was still dead. Starter would just click. So I checked all the basic electrical stuff like start button, starter solenoid and starter for corrosion. Everything looked ok. Next, I put my volt meter on the battery, with cables attached, and it read less than 1 volt! Obviously not enough juice to do anything. So I figured the battery was bad. Upon removing the battery cables, and checking the voltage without the cables attached, it spiked up to 2.15 volts. So I think I'm on to something. My thought was that the cables were crossed on the battery (i.e. the chassis ground was connected to the pos. terminal) which would allow the charger to work. So I charged the battery over night, with the cables disconnected, and it took a full charge. So, I put a negative battery terminal cable on and attach it to the chassis and then connect the positive wire to the positive on the battery. I go to start the truck and it was cranking enough to build oil pressure but didn't fire. Not knowing the vehicle, I began to check fuel supply and there was none. After putting 4 gallons of fuel in it fired right away and ran great.
With it running, I checked the voltage at the battery and it read 6.45 volts with only a little fluctuation.
NOW, this is my concern. Just tonight I'm hearing about a positive ground system and I HAVE NO CLUE what this means or if the truck is going to blow up...
Will you please provide me some insight? Is it a positive ground from the factory and how would I know if it has been converted to negative ground? What should I do next?
Thank You.
John
Dick
Answer
Step one is to immediately disconnect the battery, if you haven't already done so, because this situation can and will lead to an underhood fire if the battery was in backwards long enough to damage the voltage regulator.
On to diagnosis (and a little history): You are going to have to read this very carefully - do it step by step, and read all the way through it before you start. This is complicated and confusing, I know, but I don't know how to make it easy!
Many if not most of the vehicles built prior to 1956 were wired positive ground (because it is a better system). This includes all Ford, Chysler Corp and most "independent" products. GM was a notable exception, their vehicles were negative ground, which has now become the industry standard.
This means that the truck was originally hooked up with the + terminal of the battery connected to the chassis/engine ground, and the - terminal of the battery connected to the starter and every other electrical device on the truck via the appropriate switch or relay. The vehicle can be made to run either way, as long as the wiring is set up right and the generator and regulator are also set up for it.
We need to do some detective work to find out which way the truck is now set up to run (someone may have converted it to negative ground, is what I am saying, and we have to determine that).
I advise taking a step by step approach as follows:
1. Put the battery cables on the original way (+ to chassis, - to electrical items) but as you connect the last end of the second cable (which one doesn't matter) with everything turned off in the truck, check to see whether or not there is a spark as you tap the cable end to the connection. If you see a spark, don't connect it yet (we'll come back to this).
2. If there is no spark, go ahead and connect the cables and turn on the headlights - then go look at the ammeter (if the truck has one) and note whether it is reading a charge or a discharge. Probably it doesn't have one, so we'll have to find out another way, but if it does have one, this is the easy way. OR, if it has a voltmeter, see if it is reading below zero, or about right (6.5 volts). If it has no guages, post a "follow up question" to me and we'll find another way to do this.
If the gauge reads correctly ("discharge" from the headlight drain, or upscale on the voltage scale), go to step 3.
If the gauges read backwards (showing a "charge" when the headlights are on, (engine stopped), or showing a voltage less than zero), reverse the battery connections and go back to step 1, but with the battery now hooked up for negative ground ( - to chassis, and + to the electrical system). Then go to step 3.
3. Next, start the engine and monitor the battery voltage with your portable meter as you rev the engine to fast idle. If the charging system is OK, you will see a rising voltage as the generator replenishes the battery after the start - it will keep rising until it gets to about 7.2 volts, if everything is undamaged and hooked up correctly. If the voltage stays steady, and doesn't climb up toward 7.2 volts, the charging system is not working. The truck can still be driven this way during daylight hours, but you will have to "top up" the battery after every trip until you get the charging system repaired. Do NOT leave the vehicle with the battery hooked up, because a common failure mode for a damaged voltage regulator is to drain the battery through the generator windings, which can and often has resulted in the vehicle being destroyed by a nasty underhood fire.
As for what might be wrong with the charging system, that is another very long discussion - but let's get the polarity issue straightend out first, then tackle that issue, OK? My fingers are getting sore!
OK< all the way back to step 1: If, when you tapped the battery cable on the last connection there WAS a spark, do not connect the battery cables yet. Make very sure there is nothing on inside the truck (lights, radio, heater, anything at all). If not, then, find the voltage regulator and remove the wires from it, and tape the ends so they cannot touch anything. Do the same with the generator wires. Now tap the battery connection again - if there is still a spark, there is still something drawing current - look further until you find it, disconnecting things if you have to until there is no spark when you connect the cables. Once you get to that point, hook up the cables and do the tests of step 2 again. If the battery cable makes a spark when you tap it on the connection ONLY when the generator and voltage regulator are hooked up, there is a problem in the charging system, whether it is charging or not. Probably it is going to have to go to a generator shop for service, if you can find one in your area. Don't hook up the charging system in this condition - it could easily lead to an underhood fire. You can drive it that way, as long as you don't use the headlights or drive very far without recharging the battery.
Post a follow up report to me on what you learn from the above tests, and we'll take it the next mile.
Good luck!
After reading the post above I am starting to wonder if I have a similar problem. I have to check with the person who did the 12V conversion on the F100 to find out what they did. I will follow up with a posting here once I find out.
Posted on May 28th 2013
So I was able to continue troubleshooting. After fixing the starter drive (using my welder), I put the starter back on. It fired three to four times and then got stuck. I tried overwriting the solenoid (by bypassing it), no luck.
The driver kept coming off. I noticed from other websites that what I thought is two parts is actually one. Therefore I took it upon my self to weld them together. This experiment was actually successful. I put it back together and as stated above it fired for three four times and then got stuck.
Step two
Removed the starter again.
After removing it I found out the safety pin holding the spring together came off. I was lucky to pull the whole assembly out without loosing any parts inside the flywheel hole.
So I went for a search of a pin. Two auto parts places and a home depot later -- and a total of $3.00 cost plus a monster
truck for my son for $5.99
I tried "bench testing" the started with a 20A 6V power supply and no sign of kicking the gear. I did a bit more research to find out the starter actually draws about 10 times more power. Something like 1.2KW not 120W.
So I went ahead and put it on the vehicle again for the fourth time. I am getting good at this let me tell you. I secured all the cables with much confidence that everything is ready to go.
... Not so fast cowboy. Not suck luck. Now I can only hear a clicking sound coming from the solenoid.
I ordered a new solenoid today for $12.00 but just to gain more confidence I just overwrote the solenoid (by bypassing it) and the starter sounds good. Yeah... Now I am waiting for the new solenoid so I can move on with this thing.. I will post again when I receive it in.
 |
| Side view of the Truck |
A bit of Historical info:
The Truck was purchased in 1957 by Henry James Hall of Lutsen MN. My uncle Henry (goes by Jim) was the second owner of the truck. He used it on/off from 1957 through 1993 as a work truck.
Restoring the truck will be quite a bit of work. Been a work truck for a logger in the North woods it got a lot of abuse. Now it needs TLC ( a lot of it). I will keep posting updates on the work done on the truck periodically.
My initial plan is to get it running (mechanically reliable). My uncle put an electric fuel pump that I am considering replacing with a mechanical pump. The vehicle was also converted to a 12V system. The starting motor also gave up on us as we were unloading the vehicle from the Uhaull transponder.
The action plan is:
1. Fix the driver door latch: I have already done this. I will post a picture tomorrow
2. Fix the Starting motor to get it running. Target completion 05/27/13 (memorial weekend)
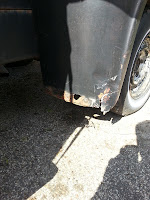
3. Start fixing the body -- Look at the rear fender:
 |
| Rear Right fender was damaged. Needs to be either fixed or replaced. |
4. Fix the wiring to the tail lights on the back. The existing wiring needs to be stripped out.

5. Fix the fenders:


6. Replace the windshield and the broken driver window


"Three on the Tree"

More updates coming soon. Write to blog if you have any ideas!!

posted 05/24/05 by Sophronis Mantoles
Here is some info on the Trucks from wikipedia:
Here is a quick video from back in November of 2012 when we first got the truck running. After sitting for 20 years, we put fresh gas, a new battery, cleaned up the points and vala..
http://youtu.be/iSba6B6XUOg
I fixed a couple of minor things over the weekend. Removed an old towing hitch and the front licence plate. I also took the starting motor off and found out that I need to do some work on it. I have to replace this component on it ( I am not sure what is called yet):

Here are a couple of pictures:

 After
After
I also found out that I will need to do something on the floor by the right door.
Here is a picture of the hinge I cut off:

posted on 05/26/13 by Sophronis Mantoles
After having troubles with my starting motor situation I started reading about it and came up with the following post on this web site:
http://en.allexperts.com/q/Classic-Antique-Car-2542/1955-Ford-F100.htm
Question
Hi Dick,
I am a little confused on this whole "positive ground" situation and it's getting deeper by the minute.
Background: A friend was temporarily storing this truck for someone and after driving it for a couple weeks the truck wouldn't crank. He replaced the battery with a new 6v battery from Napa #7204 and it drove for a couple more days until the truck wouldn't start again. I got involved to "help" and suggested the alt/gen was not charging properly.
I started out by getting a 6v charger and checking the terminals on the battery which appeared to be loose. My plan was to charge the battery and get it started to trouble shoot some more. So I put the charger on the battery as I typically would red to pos. and black to neg. and the charger would click on and off. I didn't think much of this because I have a few "micro processor" charger for 12v systems and the click on and off all the time. When I went back the next day the truck was still dead. Starter would just click. So I checked all the basic electrical stuff like start button, starter solenoid and starter for corrosion. Everything looked ok. Next, I put my volt meter on the battery, with cables attached, and it read less than 1 volt! Obviously not enough juice to do anything. So I figured the battery was bad. Upon removing the battery cables, and checking the voltage without the cables attached, it spiked up to 2.15 volts. So I think I'm on to something. My thought was that the cables were crossed on the battery (i.e. the chassis ground was connected to the pos. terminal) which would allow the charger to work. So I charged the battery over night, with the cables disconnected, and it took a full charge. So, I put a negative battery terminal cable on and attach it to the chassis and then connect the positive wire to the positive on the battery. I go to start the truck and it was cranking enough to build oil pressure but didn't fire. Not knowing the vehicle, I began to check fuel supply and there was none. After putting 4 gallons of fuel in it fired right away and ran great.
With it running, I checked the voltage at the battery and it read 6.45 volts with only a little fluctuation.
NOW, this is my concern. Just tonight I'm hearing about a positive ground system and I HAVE NO CLUE what this means or if the truck is going to blow up...
Will you please provide me some insight? Is it a positive ground from the factory and how would I know if it has been converted to negative ground? What should I do next?
Thank You.
John
Dick
Answer
Step one is to immediately disconnect the battery, if you haven't already done so, because this situation can and will lead to an underhood fire if the battery was in backwards long enough to damage the voltage regulator.
On to diagnosis (and a little history): You are going to have to read this very carefully - do it step by step, and read all the way through it before you start. This is complicated and confusing, I know, but I don't know how to make it easy!
Many if not most of the vehicles built prior to 1956 were wired positive ground (because it is a better system). This includes all Ford, Chysler Corp and most "independent" products. GM was a notable exception, their vehicles were negative ground, which has now become the industry standard.
This means that the truck was originally hooked up with the + terminal of the battery connected to the chassis/engine ground, and the - terminal of the battery connected to the starter and every other electrical device on the truck via the appropriate switch or relay. The vehicle can be made to run either way, as long as the wiring is set up right and the generator and regulator are also set up for it.
We need to do some detective work to find out which way the truck is now set up to run (someone may have converted it to negative ground, is what I am saying, and we have to determine that).
I advise taking a step by step approach as follows:
1. Put the battery cables on the original way (+ to chassis, - to electrical items) but as you connect the last end of the second cable (which one doesn't matter) with everything turned off in the truck, check to see whether or not there is a spark as you tap the cable end to the connection. If you see a spark, don't connect it yet (we'll come back to this).
2. If there is no spark, go ahead and connect the cables and turn on the headlights - then go look at the ammeter (if the truck has one) and note whether it is reading a charge or a discharge. Probably it doesn't have one, so we'll have to find out another way, but if it does have one, this is the easy way. OR, if it has a voltmeter, see if it is reading below zero, or about right (6.5 volts). If it has no guages, post a "follow up question" to me and we'll find another way to do this.
If the gauge reads correctly ("discharge" from the headlight drain, or upscale on the voltage scale), go to step 3.
If the gauges read backwards (showing a "charge" when the headlights are on, (engine stopped), or showing a voltage less than zero), reverse the battery connections and go back to step 1, but with the battery now hooked up for negative ground ( - to chassis, and + to the electrical system). Then go to step 3.
3. Next, start the engine and monitor the battery voltage with your portable meter as you rev the engine to fast idle. If the charging system is OK, you will see a rising voltage as the generator replenishes the battery after the start - it will keep rising until it gets to about 7.2 volts, if everything is undamaged and hooked up correctly. If the voltage stays steady, and doesn't climb up toward 7.2 volts, the charging system is not working. The truck can still be driven this way during daylight hours, but you will have to "top up" the battery after every trip until you get the charging system repaired. Do NOT leave the vehicle with the battery hooked up, because a common failure mode for a damaged voltage regulator is to drain the battery through the generator windings, which can and often has resulted in the vehicle being destroyed by a nasty underhood fire.
As for what might be wrong with the charging system, that is another very long discussion - but let's get the polarity issue straightend out first, then tackle that issue, OK? My fingers are getting sore!
OK< all the way back to step 1: If, when you tapped the battery cable on the last connection there WAS a spark, do not connect the battery cables yet. Make very sure there is nothing on inside the truck (lights, radio, heater, anything at all). If not, then, find the voltage regulator and remove the wires from it, and tape the ends so they cannot touch anything. Do the same with the generator wires. Now tap the battery connection again - if there is still a spark, there is still something drawing current - look further until you find it, disconnecting things if you have to until there is no spark when you connect the cables. Once you get to that point, hook up the cables and do the tests of step 2 again. If the battery cable makes a spark when you tap it on the connection ONLY when the generator and voltage regulator are hooked up, there is a problem in the charging system, whether it is charging or not. Probably it is going to have to go to a generator shop for service, if you can find one in your area. Don't hook up the charging system in this condition - it could easily lead to an underhood fire. You can drive it that way, as long as you don't use the headlights or drive very far without recharging the battery.
Post a follow up report to me on what you learn from the above tests, and we'll take it the next mile.
Good luck!
After reading the post above I am starting to wonder if I have a similar problem. I have to check with the person who did the 12V conversion on the F100 to find out what they did. I will follow up with a posting here once I find out.
Posted on May 28th 2013
So I was able to continue troubleshooting. After fixing the starter drive (using my welder), I put the starter back on. It fired three to four times and then got stuck. I tried overwriting the solenoid (by bypassing it), no luck.
 |
| 6V original starter |
Step two
Removed the starter again.
After removing it I found out the safety pin holding the spring together came off. I was lucky to pull the whole assembly out without loosing any parts inside the flywheel hole.
|
| showing the original spring -- half busted |
truck for my son for $5.99
I tried "bench testing" the started with a 20A 6V power supply and no sign of kicking the gear. I did a bit more research to find out the starter actually draws about 10 times more power. Something like 1.2KW not 120W.
So I went ahead and put it on the vehicle again for the fourth time. I am getting good at this let me tell you. I secured all the cables with much confidence that everything is ready to go.
... Not so fast cowboy. Not suck luck. Now I can only hear a clicking sound coming from the solenoid.
I ordered a new solenoid today for $12.00 but just to gain more confidence I just overwrote the solenoid (by bypassing it) and the starter sounds good. Yeah... Now I am waiting for the new solenoid so I can move on with this thing.. I will post again when I receive it in.
Subscribe to:
Posts (Atom)