Tuesday, June 25, 2013

The next steps..

My restoration project is going well except I had a small set back during my work on the muffler.  I was not able to get under the truck to install the muffler so I have been trying to find a person with a lift.  The muffler is ready to go on but its hard to work on it with ramps.  I will figure out a way around it.  Basically the muffler goes on, a clamp connects to the exhaust pipe and the tail pipe connects to the other end with two or three places to hold onto the chassis.  I am still researching it.  In the meantime here is my priority list for the next few days.
1. Fix the horn (redo the wiring to it).

Horn Button


The horn button inside the steering wheel needed to be fixed.  Filled it up with epoxy and put it back in.  It seems to work except the horn needs cleaning or it is stuck.  I applied 12V 5A to it and all I get is a clicking sound.  How much current do these things draw? 10A??

2. Fix the rear wiring -- updates soon.

3. Install two new shocks on the back -- need to order

4. Fix the steering slack. -- Not sure of the source yet

5. Install new trusses and a wooden bed in the back bed.


Monday, June 17, 2013

Front end work -- Partial -- Sealed beams and Muffler prep work!!

As discussed previously my main goal is to get rid of the steering column slack.  First things first I inspected the front ball joints and as I was doing this I noticed the u bolts holding the leaf springs in place -- near the front shocks were all loose.  I tried to tighten them but they were too rusty. I went ahead and ordered two Monroe shocks for the front.

http://www.amazon.com/gp/product/B000COO3PM/ref=oh_details_o00_s00_i00?ie=UTF8&psc=1

Here is a picture of the old shock absorbers:

old shock absorvers (what ever is left of them)

Putting the new shocks on would have been a ten minute job if it was not for the rusty u bolts

Finding replacement bolts was also a challenge.  Thank God for Northern Tools that carry a similar bolt for trailers.  After two trips to the store two Popsicle sticks and two planes for Andreas we completed this task by the end of the day on Saturday:

Andreas (my son) enjoying his Popsicle and holding on to his $2.00 plane


The next job completed was replacement of the head lights.  This was not too trivial except one of the sockets holding the sealed beam was shorting out.  I went ahead and replaced it.

Small crack on the chassis welded
No need to say too much here.  This truck was a work truck.  It got abused.  My uncle pointed out the crack this weekend.  Took me a few minutes to clean up the rust and stitch it back together.


Prepping the muffler was also a bit of work.  After three welding jobs the muffler is ready to go on.  I can not wait to get it installed.  This thing is pretty loud.


Wednesday, June 12, 2013

Front End Work

I am starting to get more run time on the Truck and just initiated insurance coverage.  I will post more info on this soon because I run into an interesting problem.

I spoke with my uncle Dennis and he mentioned that it would be best to rebuild the truck's front end.  Replace all the ball joints, cross bars etc.  I got under the truck a couple of days and started shaking things to see what wiggles.  I noticed that the large bolts holding the leaf springs in place on the front are loose.  This is definitely an issue and I hope not a very difficult one to resolve.  In the worst case I can cut the bolts off and replace them with new ones.

I will post pictures of this area in a day or two but I wanted to give everyone an update first.  I also will need to change the front and the back shock absorbers (starting with the front one's first).

I hope this will not end up been a big deal.  I will keep you posted!!

Pictures to follow!!


Monday, June 10, 2013

Little Truck is running again!!

So after all the work I have done this far I am starting to put some runtime on the engine!!  Drove the little truck around the block a few times.  So far so good.  Neighbors came up to see the truck.  It needs work but it runs!!


Sunday, June 9, 2013

White smoke where is it coming from??

Posted on 06/09/13

After rebuilding the carburetor, I did a bit more electrical work.  I replaced the Main lights (7" Sealed Beams).  I actually had to pull the old solder iron out, and some heat shrink tubing.   I tested the lights and everything seems to be working well.  

My Father in Law Miltiades Marinos happened to be around when I was done working on the truck.  He remembers the truck when it was fairly new on the North woods.  I took him for a spin around the neighborhood.  That was more of a spin down in memory lane for him.  I drove the vehicle for about 10 minutes and going up the hill from my house the vehicle hesitated a bit (as if it was getting starved for gas).  At that point I stepped on the gas and a huge cloud of while smoke came out.  I was a bit concerned so I drove it back in the garage.

I did some research on this overnight.  The most logical explanation is that my air to gas ratio mix is incorrect.  I will have to adjust this soon.  I spoke with my brother who is a mechanic and he suggested to run the car and check to make sure the coolant is circulating properly in the radiator.  My uncle Dennis Hovde also mentioned that there should not be any concerns with the radiator.

I started the vehicle today again and drove it a bit.  I checked and the temperature of the upper and lower radiator hoses is about the same.  Good signs.

Here is a picture of the ultimate goal for this project to keep the target in mind while going through all this work.

This is my ultimate goal.  We are getting there slowly but surely!!  


Thursday, June 6, 2013

Continuing the work.. Carburetor rebuild

As mentioned in my previous post this was a safety issue that had to be addressed right away.  The vehicle was not driveable with a leaky carburetor.  I purchased the rebuild kit and took the whole thing apart.  I read the instructions this time.  I did a lot of cleaning using carburetor cleaner and sea foam.  The carburetor cleaner does a better job.

Here is a picture of all the parts:

Before I started taking everything apart.

During the process of rebuilding


Rebuild work completed
Taking a carburetor apart and putting it back together is a tricky business.  You have to do things slowly.  Study all the screws and where they go.  Clean the jets very well.  Remove all the debrie from inside.  It took me a total of three evenings to complete the job.  Cleaning everything very carefully pays back.  I put the carburetor back and started the Truck.  I only had to adjust the idle mix.  The engine sounded much more smooth after this was done.

I will take a video of the engine running tomorrow.

Till later...

Sunday, June 2, 2013

More work, but its fun work

So the Bottom line is that the truck starts and runs now.  But like I said at the beginning of this blog, this is and will be work in progress for a while.  I made a lot of progress over the last few days.  I was able to fix the starter, replaced the solenoid, replaced a main positive terminal cable, replaced spark plugs.

The next step critical to be able to drive the truck is the carburetor leak (this is more a safety issue now).  I went ahead and placed a fire extinguisher in the truck just in case.

I am in search of a rebuild kit for the carburetor.  Here is a picture:

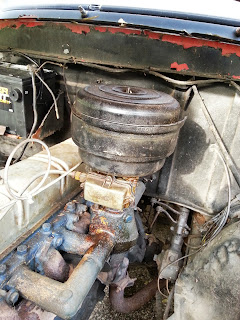
picture showing the leak
The carburetor is made by Holley.  A quick google search returns hundreds of links.  I have to find the right one.

While replacing the the spark plugs I also noticed that a couple of spark plug wires literally fell apart in my hands as I was taking them out.  So I ordered a set of wires and as soon as I get them they are going on.

Here is a picture of what the wires look like right now:

Kind of messy.  Once I get the new cables I will reorganize them. The nicest thing about these older vehicles and motors, they are really easy to work on.  I could not imaging getting all this work done in such a short time on a newer car or truck.